
Jorge Castillo: With a crisp crust on the outside and a lightly textured inside, a warm, fresh-baked loaf of Cuban bread is the next best thing to heaven.
Glenn Lindgren: Although there are some limited areas of the country where you can get a decent loaf of Cuban bread, (cities like Chicago and Union City New Jersey), the best Cuban bread is made in South Florida. In fact, the "Cuban Bread Line" (the Mason Dixon line of Cuban pastry) stretches across the state just north of Tampa. Stray north of the Cuban Bread Line and you have two chances of getting a decent loaf: slim and none.
Jorge Castillo: Yes, you can find Cuban bread at practically every supermarket in Miami. However, the big chain groceries have never quite gotten it right.
Glenn Lindgren: Although these store-made loaves will do in a pinch, the only place to get the real thing is from a Cuban bread bakery. And if you don't have a Cuban Bakery in your town, you have to make it yourself!
Jorge Castillo: This recipe is the real deal. You CANNOT make Cuban bread without lard. If it doesn't have lard, it's NOT Cuban bread! So please don't substitute!
Glenn Lindgren: In Tampa, they use palmetto leaves to create the seam on top of the bread.
Raúl Musibay: That gives the loaves the classic appearance!
Glenn Lindgren: You can also use a sharp knife and cut a couple of seams the length of the loaf.
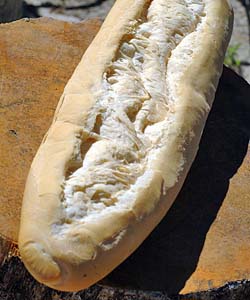
With a crisp crust on the outside and a lightly textured inside, a warm, fresh-baked loaf of Cuban bread is the next best thing to heaven.
INGREDIENTS:
1 tablespoon active dry yeastBaking bread, any kind of bread, is truly an art. Baking a perfect bakery-quality loaf of Cuban bread is the ultimate accomplishment for any home bread baker. On the surface, Cuban bread seems so simple; it consists of just five main ingredients: flour, water, yeast, lard, and salt.
The challenge, however, is putting these simple ingredients together in exactly the right way. The goal is to create a loaf with a crisp crust on the outside and an airy, lightly textured inside.
The key to baking a great loaf of Cuban bread is in knowing exactly how much flour to use to bring the dough to the perfect consistency. Too much flour, and the bread will be too dense. Too little flour, and the dough won't rise properly, resulting in a very wide, flat loaf of bread!
If you don't mind a challenge, the quest for that perfect loaf of Cuban bread can be very rewarding.
This new Kindle version contains all of the recipes and editorial copy from the original print edition. As a bonus, the new Kindle edition includes 14 new photos of the prepared dishes.
Use the FREE Kindle Reading App and view our cookbooks on your notepad, tablet, laptop, or computer.
Drinks | Appetizers | Salads | Main Dishes| Soups | Side Dishes | Desserts | Index


Cuban, Spanish, and Latin American food recipes, Miami/Little Havana Travel Guide, Miami Restaurant Guide, Hispanic Culture & Food
No copying or commercial duplication of any content (including photos) without the express written permission of the authors and proper attribution.